Submitting and Distributing a Safari App Extension

By Thomas Steiner. Written on . Apple Browser Extensions macOS Safari Technical
Safari 14 has added support for the Web Extensions standard, which I consider a clever move on Apple's side that deprecated Safari's previous .safariextz-style Safari extensions. While there is great documentation for creating a Safari Web Extension from scratch or for converting a Web Extension for Safari (and at least the outlines for converting a legacy Safari extension to a Safari app extension), the documented path currently ends at building and running the application. This post documents the steps for submitting and distributing a Safari App Extension.
The post assumes you already have an Xcode project either created manually or via the converter script and that you use Swift. Here is an example build script for one of my extensions for reference. Some of these steps may improve or change over time for new versions of Xcode; this guide was written for Version 12.0 (12A7209). Caveat: this is my first time interacting with Xcode, so if any of the steps do not make sense, thanks for correcting me.
- Change the bundle identifier of the extension from
com.example.footo-Extensioncom.example.foo.Extension(that is, replace the '-' with a '.') and reflect the change inViewController.swift. For some reason this is necessary.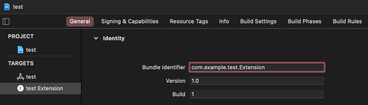
- Change the App Category.
- Change the version number for app and extension.
- Update the build number in app and extension.
- Create a new certificate via your developer profile.
- Create a new app via App Store Connect.
- In Xcode, run
Product > Buildand thenProduct > Archive. - In Xcode, open
Window > Organizerand then first validate, then distribute (don't change any of the settings). - Hope for the best…
I successfully went through the process with two extensions now:


(Thanks to Timothy Hatcher who has been very helpful in navigating me through the process.)